Hướng dẫn cấu hình Zoho Mail trên Outlook
Steps to Configure your Zoho Account as POP in Outlook
- Enable POP in the Zoho Mail interface.
- Launch Outlook application in your system.
- Browse to Tools » Account Settings » Email Accounts » Email tab
- Click New to open ‘Add new email account’ window.
- In Add New Account settings page, Select ‘Manually configure Server settings or Additional Server Types’ » Click Next
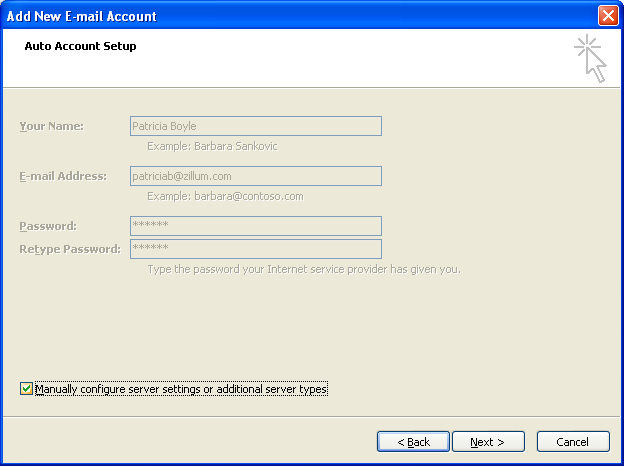
- Select Internet Email in the page that appears and Click Next to input the User Information.
- User Information
- Your Name – Preferred Display Name
- E-mail Address – Provide your Zoho Email Address
- Server Information.
- Account Type – Select POP3 for enabling POP
- Incoming mail Server – pop.zoho.com
- Outgoing mail Server – smtp.zoho.com
- Logon Information
- User name – Your Zoho Email Address
- Password – Zoho Account Password
You may require Application Specific password to set up the account in other devices, if Two Factor Authentication is enabled for your account. - Select ‘Remember Password’

- Click ‘More Settings’, for advanced configuration detail. In the dialog that appears, select 'Outgoing Server'.
- Select ‘My outgoing server (SMTP) requires authentication’
- Select the option ‘Use same settings as my incoming server’
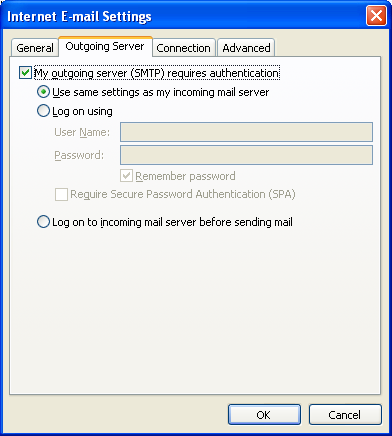
- If this option is not set, you may get an error 'Authentication Required' or 'Relaying Disallowed' error.
- The Relaying Disallowed Error may also occur when the 'email address' is provided incorrectly and does not match the email address set up for the account, whose credentials are provided in the email client.
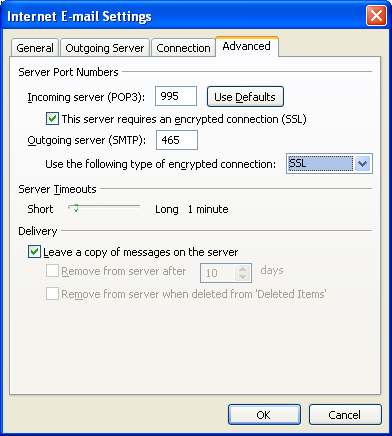
- Select ‘Advanced’ to specify the port details for the POP and SMTP servers.
- Incoming Server (POP3): 995
- Select ‘This server requires an encrypted connection (SSL)’
- Outgoing Server (SMTP): 465
- Select ‘SSL’ from the drop down for encrypted connection
- Select ‘Leave a copy of messages on the server ‘ if you need it in Zoho mail also. Refer 'POP Delete settings' for deletion behavior in Zoho Mail.
- Click Ok to Save the settings and exit.
- Select 'Test Account Settings' to check the settings for Incoming and Outgoing Servers. Make sure, you have a working internet connection, with permissions for Outlook to access the Internet.
- Once the Incomin/ Outgoing tests are successfully completed, Outlook displays the dialog as below.
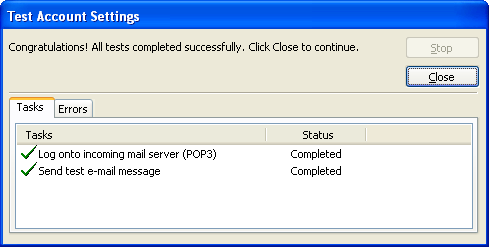
- Select Close and Finish to save the configurations and exit.
Zoho Mail - Access via IMAP
IMAP (Internet Message Access Protocol) is an email retrieval and storage protocol, which syncs with the servers and maintains the status of messages across multiple email clients.
Table of Contents
Zoho Mail can be accessed via IMAP in any standard IMAP clients using the configuration details provided in this page. Login to your webmail and Enable IMAP Access for your account before you begin the configuration in the email clients. (You may require Application Specific password to set up the account in other devices, if Two Factor Authentication is enabled for your account).
The step by step instructions for some of the popular IMAP clients are available in the links below.
Mobile Devices/ Tablets: Apple iPhone/iPad | Windows 7 Mobile | Android (Samsung, Google Nexus etc) | Other mobile IMAP Clients
IMAP - An introduction
IMAP and POP are two different protocols that allow you to download the emails from your Server and access them from the email clients of your choice. The protocols allow you to access the Zoho Mail account from desktop clients like Outlook or from mobile devices like iPhone. Zoho Mail can be configured in any standard IMAP email client providing the IMAP and SMTP server settings
IMAP is the most recent protocol than POP. IMAP allows a two way synchronization between the email client you use and your Zoho Mail account. IMAP is also recomended when you want to access the same account from multiple email clients.
Enable IMAP Access
- Login to Zoho Mail account
- Go to Settings >> Mail >> POP/ IMAP and Email Forwarding
- Under IMAP Access, select 'Enable' to enable IMAP Access

- Configure the Expunge Settings and the Folder View settings.
- If the IMAP Access is Disabled, the email clients will not be able to access your Zoho account via IMAP.
Zoho Mail IMAP Server Details
You can configure your Zoho Mail account in any standard IMAP client. The required configuration details for accessing Zoho Mail account via IMAP are given below.
Incoming Server Settings:
Incoming Server Name: imap.zoho.com
Port: 993
Require SSL: Yes
Port: 993
Require SSL: Yes
Outgoing Server Settings:
Outgoing Server Name: smtp.zoho.com
Port: 465 with SSL or
Port: 587 with TLS
Require Authentication: Yes
Port: 465 with SSL or
Port: 587 with TLS
Require Authentication: Yes
You may require Application Specific password to set up the account in other devices, if Two Factor Authentication is enabled for your account.
User Name : Zoho user name or Your complete Zoho Mail address. If your domain is hosted with Zoho, then provide you@yourdomain.com here.
Email Address : Your Zoho email Address. If your domain is hosted with Zoho, provide you@yourdomain.com.
Password: Your Zoho account password. (You may require Application Specific password, if Two Factor Authentication is enabled for your account)
Email Address : Your Zoho email Address. If your domain is hosted with Zoho, provide you@yourdomain.com.
Password: Your Zoho account password. (You may require Application Specific password, if Two Factor Authentication is enabled for your account)
Note: If you are a Federated Sign In user, you will not have a 'Zoho' password for your account. Use the Forgot Password link in the login page, to generate Zoho specific password for your account in Zoho. The Federated Login credentials will not work for POP/ IMAP/ Active Sync access.
Folder View Settings for IMAP
You can optimize the performance of your IMAP client by choosing the folders you want to synchronize in IMAP. If you have a huge mailbox with a lot of folders, viewing and synchronizing all folders in IMAP clients like iPhone may be time consuming and cumbersome due to the size of data. You can choose the folders, which you want to sync in IMAP.
- Log in to https://www.zoho.com/mail
- Click Settings >> Mail >> Email Forwarding / POP and IMAP
- Under the IMAP access section, Click 'View or change Folders'
- Select the folders, which you want to view in the IMAP clients.
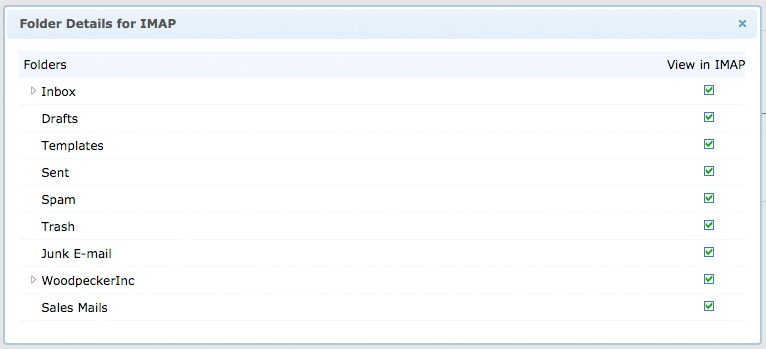
- Only the selected folders will be available for Sync in the IMAP clients, you use.
IMAP Expunge Options
When you delete or move an email in your IMAP client, the email is marked for deletion in the current folder and copied to the destination folder or Trash folder based on the IMAP settings. You can enable the option 'Expunge immediately' for such changes to be immediately effective in your IMAP account. Again this is based on the IMAP Client behavior and how it sends requests to the Server.
- Login to your Zoho Mail account
- Go to Mail Settings >> Email Forwarding and POP/ IMAP
- In the IMAP Section, Select your preferred Expunge option for IMAP
- Immediately Expunge Messages - This will remove messages in Zoho Mail when you delete/ move emails in the IMAP client
- Do not automatically Expunge Messages - This will wait till the Folder Syncs before the mail is deleted from Zoho Mai


Hey nice information
Trả lờiXóai am using hotmail from last 2 years and i have much knowledge about hotmail
if you have any problem regarding hotmail then click the link below to know how to solve it
www.hotmail.com
Hotmail is best email service provider
Trả lờiXóaif you want to use hotmail but don't know how to create a new account then click the link below to know step by step how to create a new account on hotmail
www.hotmail.com
Hi, I recently read your blog. You are writing well. I also blogged at the topic zoho mail login problems. Explore now.
Trả lờiXóa