Steps to Configure Zoho Mail account as IMAP in Outlook
- Log in to your Zoho Mail account to enable IMAP access for your account. (Select Settings >> POP/ IMAP and Email Forwarding >> Enable IMAP)
- Launch the Microsoft Outlook application in your desktop.
- Navigate to Tools » Account Settings » Email Accounts » Email tab
- Select New to setup a new account in Outlook.
- In Add New Account settings page, Select ‘Manually configure Server settings or Additional Server Types’ » Click Next
- In ‘Choose Email Service’ page, select Internet mail, click ‘Next’.
- In Add New Email Account page, type the following details.
- User Information
- Your Name – Preferred Display Name
- E-mail Address – Provide Zoho Email Address – username@zoho.com/ user@domain.com if you have your domain hosted with Zoho.
- Server Information
- Account Type – Select IMAP to create an IMAP account
- Incoming mail Server – imap.zoho.com
- Outgoing mail Server – smtp.zoho.com
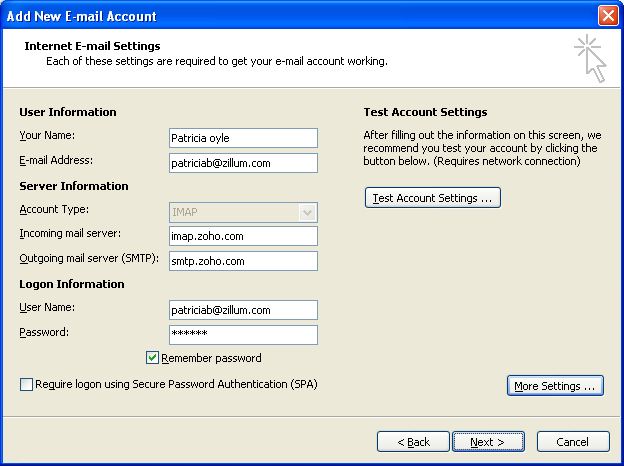
- Logon Information
- User name – The email address of your zoho account (user@yourdomain.com for Email Hosting users / sername@zoho.com for personal users).
- Password – Zoho Account Password (You may require Application Specific password, if Two Factor Authentication is enabled for your account.)
- Select ‘Remember Password’
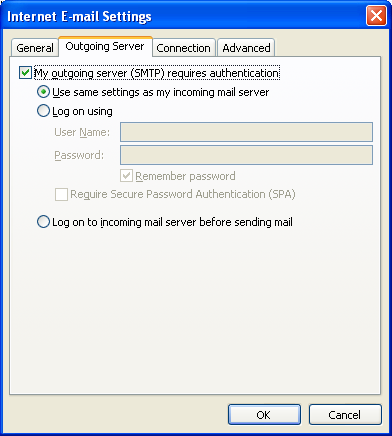
- Click on ‘More Settings’,
- In the popup that appears, click on Outgoing Server
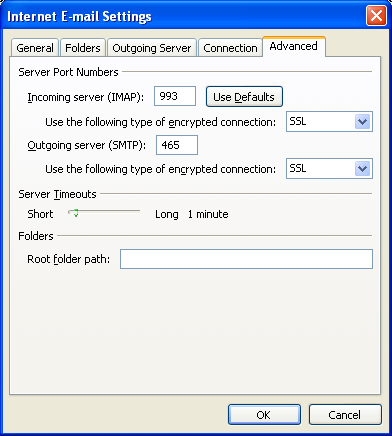
- Select the tab ‘Advanced’
- Incoming Server (IMAP): 993
- Select ‘This server requires an encrypted connection (SSL)’
- Outgoing Server (SMTP): 465
- Select ‘SSL’ from the drop down for encrypted connection
- Delivery Section
- Select ‘Leave a copy of messages on the server ‘ if you need it in ZOHO mail also.
- Click ‘Ok’. You will be back to ‘Add New Email Account’ dialog.
- Click ‘Test Account Settings’. Outlook will test the settings by sending a Test mail.
- When the tests are successful, Outlook displays a popup as shown.

- Click Close
- In the ‘Add Email Accounts’ Window, click Next.
- Outlook will display a message for successful completion of Wizard.
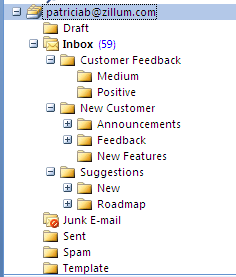
- The folder structure in your Zoho account will be replicated here.
Specific Instructions for Outlook IMAP
Sent Items
When you send emails, our SMTP Servers automatically place the sent emails in the Sent folder. However when sening an email Outlook, it saves another copy in the Sent folder of the Outlook. Change the following settings in Outlook 2007 Tools >> Options >> Preferences >> Email Options >> un-check "Save copies of messages in Sent Items folder" to avoid the duplicates in Sent folder.In Outlook 2010, Locate Account Settings >> Select the Zoho account >> Change >> More Settings >> Sent Items >> select "Do not save copies of Sent Items".
Download full message
By default, Outlook does not download the entire message when syncing the emails. It downloads just the Sender, Subject, Date information(headers) in the email. It downloads the full message, only when you click on the email. You can change this behavior by changing the Send/ Receive Settings.
Note:
In Outlook
2013, there are some issues related to Folders sync. Hence we recommend
the users to use previous Outlook versions till Outlook 2013 is
stabilized for IMAP usage.


Thank you so much for sharing this important blog for Microsoft Outlook. I solved some of my issue by your blog, in future you provide more blogs for the Outlook. If any help for Outlook dial 0800-090-3220 Outlook Customer Service Number UK
Trả lờiXóa